
In February 2017 I stumbled on one of Gary Vaynerchuk’s videos on YouTube, in which he explained how this guy called Reezy was selling over $600,000 worth of books per year on Amazon. In another, Gary announced, what he called, the 2017 Flip Challenge — buy low and sell high online.
At the time I had recently graduated from university and was looking for the ideal job. But I was hooked on the flip challenge. Selling books on Amazon in particular. So much so that I stopped applying for jobs and decided to take on the challenge.
And I’m glad that I did because, over the course of that year, I sold over £100,000 worth of used books. On top of that, I learned about other sourcing models such as Retail Arbitrage and Wholesale sourcing. After some time, I started sourcing using the latter method and now I sell over £70,000 a month.
Although I now make enough money reselling new goods, I still buy and sell used books when time permits. But if you have time and little money (like I did), you need to start selling used books. I personally believe it’s a great way to start making some extra or even a full-time income.
And the best part? It’s anyone can do it. In this how-to guide, therefore, I’m going to go show you how to start. And I will outline the processes involved at each stage of an FBA bookselling hustle: sourcing, shipping, pricing, repricing and account management.
Note: Although you can start selling used books for free, I recommend investing in some useful tools. Check out the following article to find out more about these tools including costing.
About Bookselling
The phases of a traditional bookselling business include sourcing, listing, order fulfillment and pricing. Out of which, order fulfillment is perhaps the most laborious and monotonous. You have to store, find, pack and ship orders, and follow up with customers. This method of fulfillment is called Fulfilled By Merchant (FBM). Which can be streamlined but it would require a lot of initial capital and time to make it work.
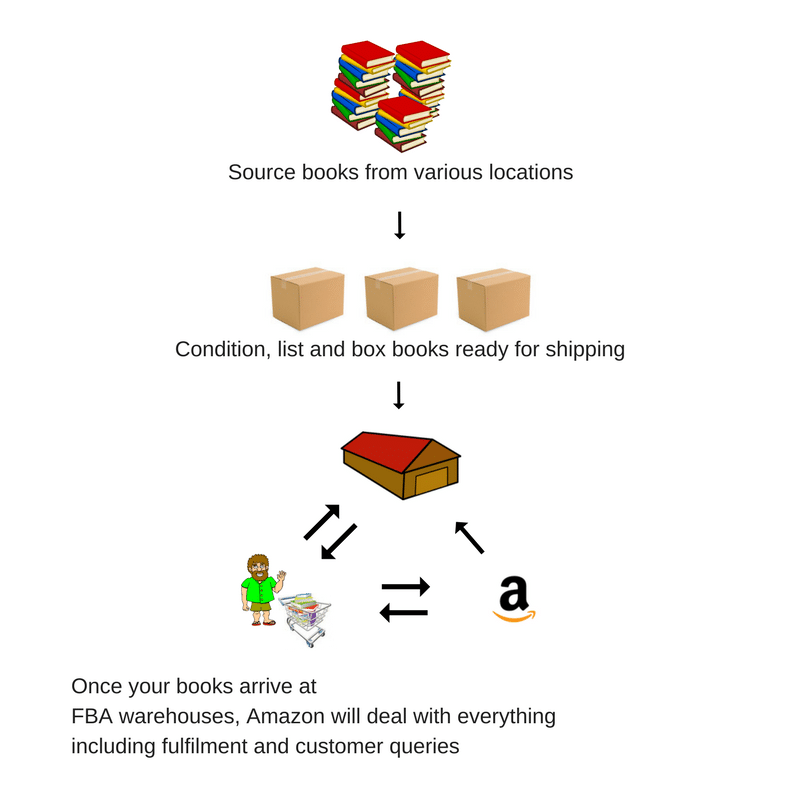
Fear not though. You can outsource the order fulfillment stage to Amazon by using its Fulfilment by Amazon (FBA) service. Through FBA you just have to send your inventory to Amazon and they will deal with everything, from finding orders to dealing with customers, all for a small fee.
Here’s my illustration of how the FBA bookselling hustle works.
 Thanks to FBA, it’s possible to compete with established booksellers with several thousands of books in their inventory from the comfort of your home.
Here are some other benefits of key selling books on Amazon using FBA:
- Small overhead. You don’t need a warehouse nor any employees; just some tools and resources, and somewhere to prepare your inventory of used books for FBA.
- Small starting capital. You don’t need much money to get started either. You can start with investing as little as £100 or even less.
- Amazon Prime Eligible. All of the books you send to Amazon are Prime eligible. This means higher sales volume and more profit. Because you can price higher since, according to Amazon, Prime customers spend more and prefer the convenience Prime provides.
Opening an Amazon Selling account
To get started, the first thing you need to do is to open an Amazon Seller account. The registration process is straightforward and quick. Then make sure to download the free handy Amazon Seller App on your phone and sign in using your new credentials.
There are two ways you can sell on Amazon. Either using a Basic or a Pro account. The former is pay-as-you-go; you pay a fixed fee (currently £0.75 + VAT) when you sell an item. The latter is a pay-monthly (£25 + VAT) type account, which would fall cheaper when you start selling 35+ units a month.
Your new selling account is likely to be on a Pro plan by default, but I would recommend starting with a Basic account. You can downgrade by clicking “Settings” and following the instructions in the video below.
Sourcing
The term sourcing simply describes the process of finding inventory to sell — and is the fun part of bookselling. And luckily for us, books are everywhere and most people think they’re all worthless. So they are easy and cheap to acquire.
But where exactly do you find books that you can resell?
Here is a list of places from where you can acquire used books:
- Charity shops (Thrift stores)
- Book sales
- Church stall sales
- Jumble sales (Garage sales)
- Car boot sales
- Online – Gumtree/Craigslist, Facebook marketplace etc.
- Libraries
- Used bookshops
- University libraries
The above list is not exhaustive. Be creative.
You can source books from a range of places but there are two ways that you can buy them:
- in bulk. Some bookseller, often the big players, purchase books in bulk. They buy thousands of books at a time and resell only the profitable ones, through both FBA and FBM.
- individually. Most small booksellers, including myself, however, prefer sourcing books individually. We like to cherry pick profitable books in a sea of worthless of books.
Choosing how to source is entirely your choice. Both methods are as profitable as each other. But I would recommend sourcing books individually because it’s cheaper and easier. On top of that, you don’t have to deal with the risk of processing thousands of worthless books.
Keep on reading to learn the guidelines that I use to find profitable books.
Sourcing books individually
The logic behind buying books individually is simple. Buy low and sell high, just like the basis of any business I suppose. But here’s the thing: not every book will be a good arbitrage. In fact, most books won’t be.
Selling books is a numbers game. The larger your portfolio of books, the higher your chance of succeeding. But size alone is not enough. The quality of your portfolio is as important. Therefore to build and maintain a portfolio of high-quality books, we use some tools and resources to help us make better buying decisions and increase our productivity when sourcing.
If you are just starting out and are unsure if bookselling is for you, only some of the tools and resources that I mention are necessary. If, however, you are serious about bookselling and have decided it’s for you, then you need to invest in all of the tools and resources of the trade.
The Amazon Seller App. This app is a must. To get started, simply go to the app store on your phone, then search “Amazon Seller” and download it. Then sign in.
The Amazon Seller App is a handy sourcing tool. We can use it to look up books and decide whether an arbitrage is on. In other words, if we can sell the book we look up for a lot higher than the price we can buy it for.
To begin, press the camera icon at the top right of your Amazon Seller App and scan the front cover of a book or its ISBN barcode on its back cover. Here is a book that I scanned earlier.
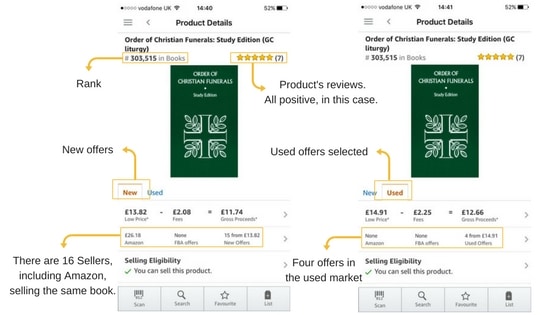
The app will then find the book and show important information such as its Amazon Bestsellers Rank (BSR), the conditions of all the offers as well as their fulfillment methods. These are essential information that helps us make good buying decisions, making the Amazon Seller app an essential tool when starting out.
Bluetooth scanner. Getting a Bluetooth scanner is optional. In the beginning, scanning books using the Amazon Seller App works. But very soon you will find that it takes a long time to read the barcode of a book, a few seconds longer, yes. But time is money in this business.
To speed things up, we use a Bluetooth scanner, which reads the ISBN barcode of a book instantly, in combination with a database app. Most sellers use either a KDC200i or an Opticon. I personally have a refurbished of the former as a brand new one costs a fortune.
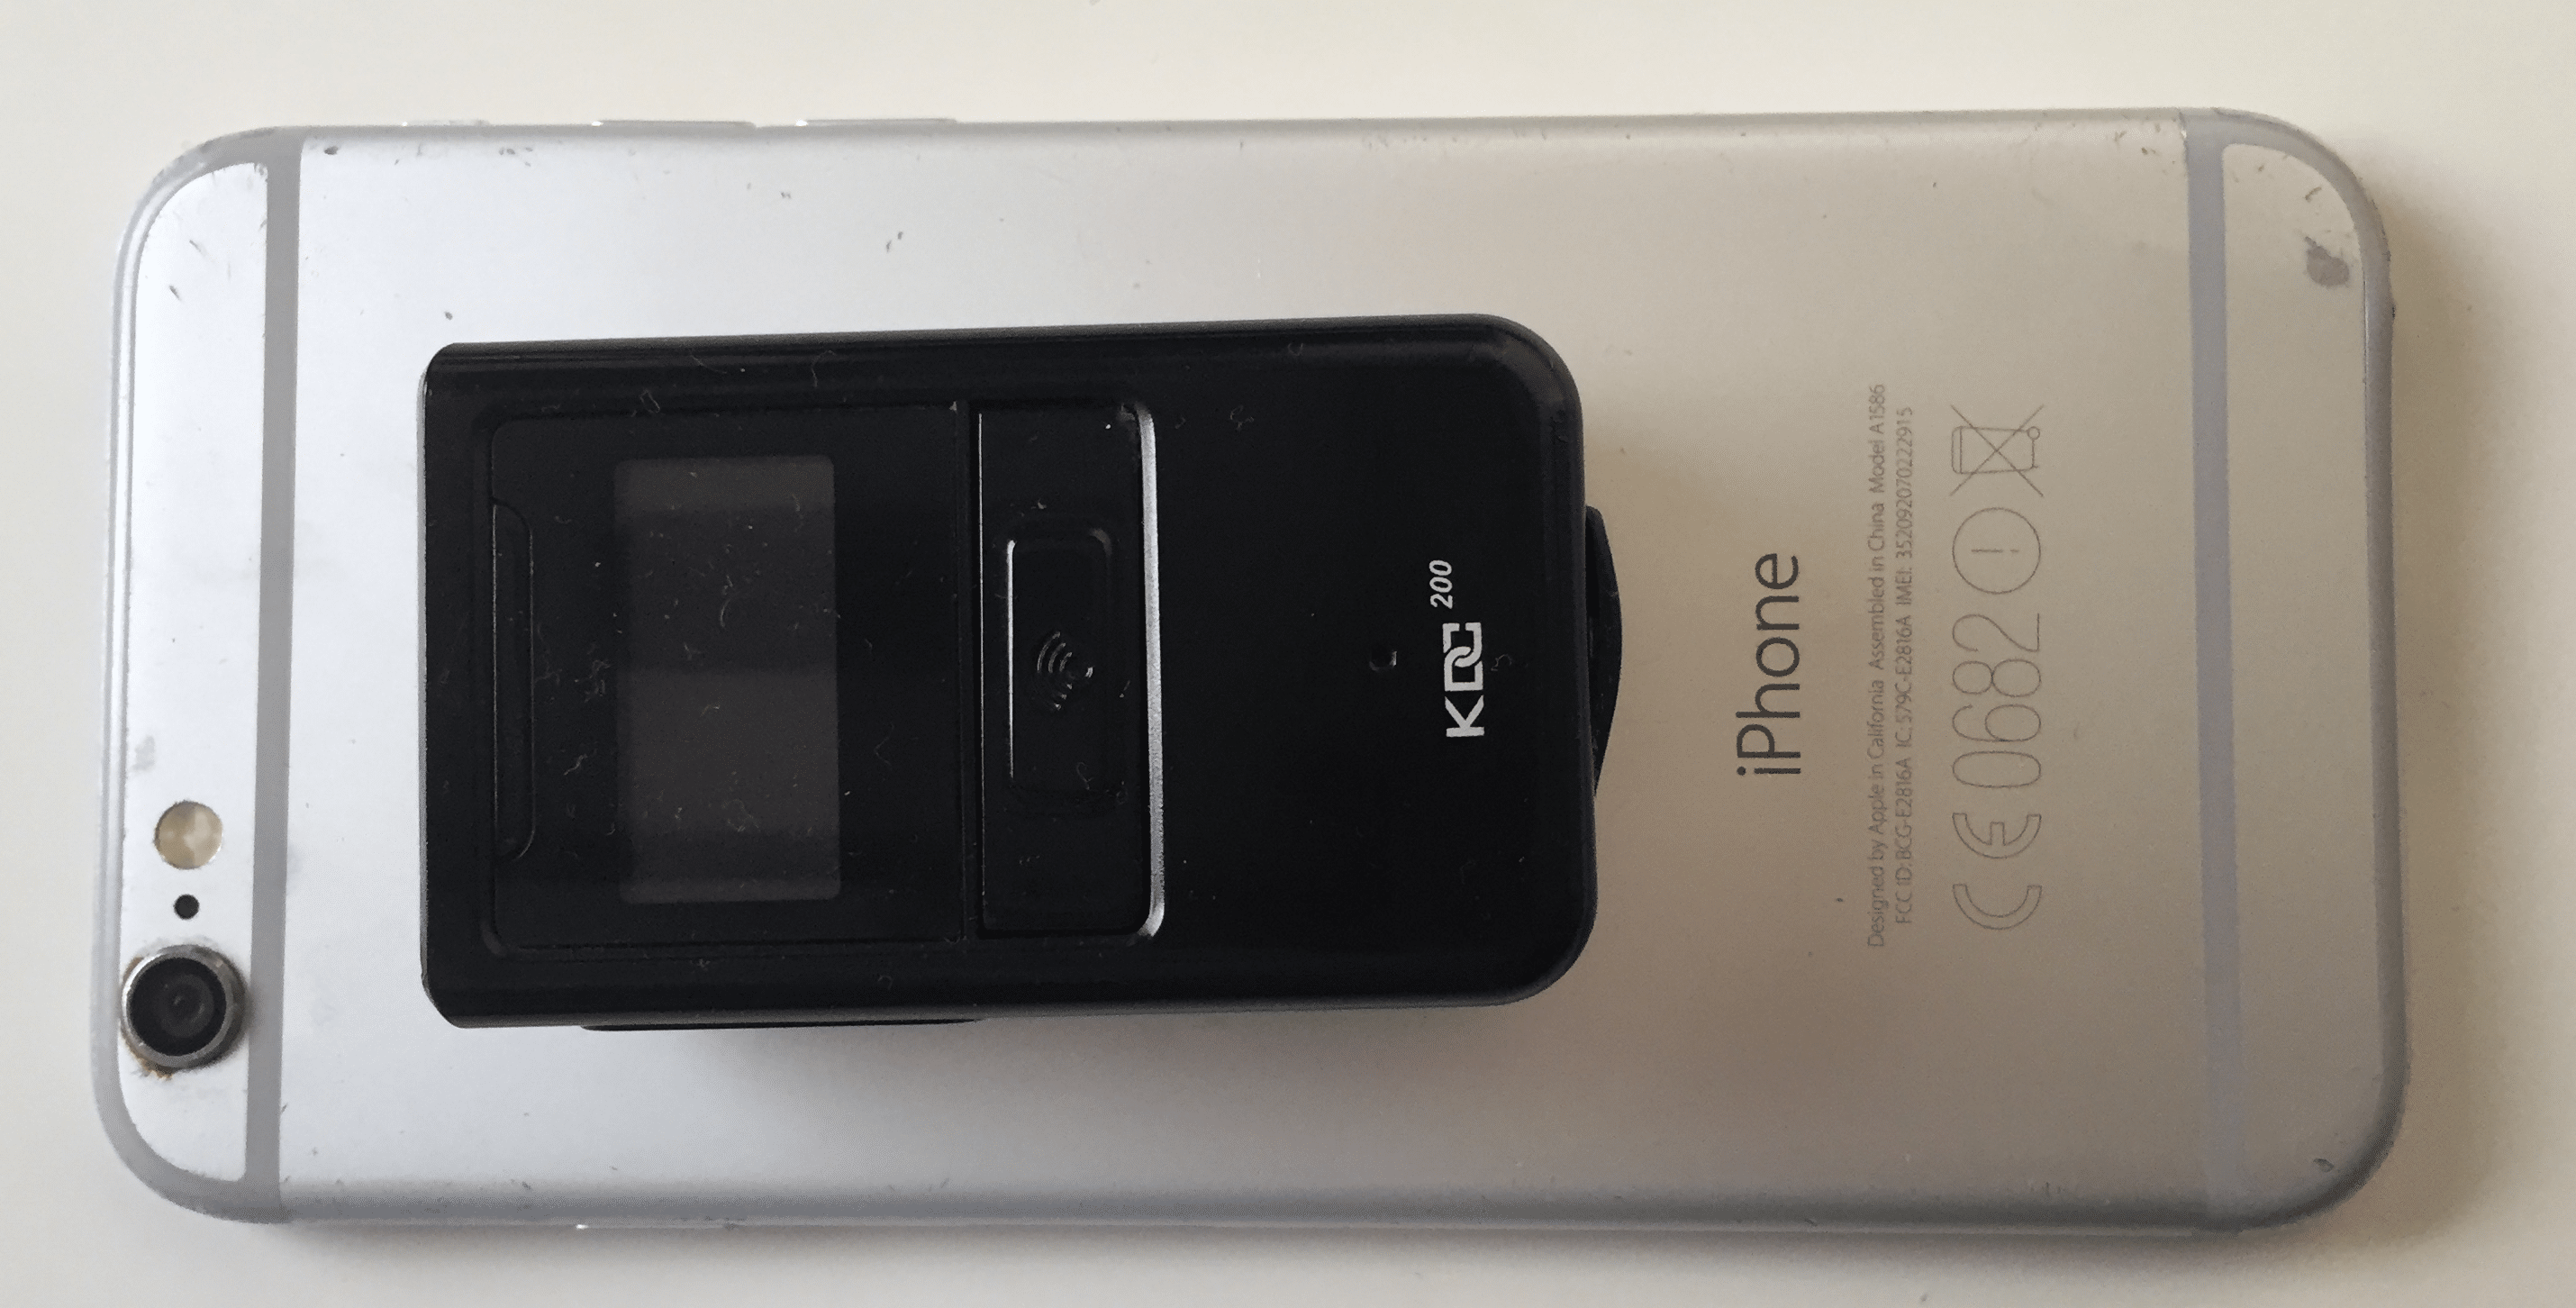
An alternative would be the Eyoyo scanner, which I initially bought but returned as it’s too bulky. But if you don’t mind, it’s a cheap alternative that does the job.
Check out my articles on barcode scanners to make an informed decision.
Database scanning app. The Amazon Seller is an essential tool but it does have some limitations. First, it’s slow at scanning books. Second, it only works in live mode. It only works when there is an internet connection. If you want to scan faster and not depend on an internet connection, you need a scanning app.
These apps have a database of data on most books on Amazon, which you download into your phone. This way, you can look up books without an internet connection, increasing your speed of scanner and productivity. Here is a list of the most popular scanning apps on the market:
- FBAScan (USA)
- Scout IQ (USA)
- NeatoScan (USA, UK)
Determining the value of a book
So you’ve decided that you want to give this a go, and want to go out scanning using the Amazon Seller App, but how do you go about picking the right books?
In order to make good buying decisions, we need to determine a book’s value at Amazon. You can do this by assessing variables such as price, demand, and competition.
Price. A good indicator of a book’s value is its price, but that’s difficult to determine at Amazon because most items have more than one offer. So perhaps we can use a book’s price range — the difference between the highest and lowest offer — to approximate its value at Amazon.
The price range is a reflection of market sentiment — it reflects the collective view of sellers about the value of a book. A small price range signals agreement about the value of a book, while a larger range indicates mixed views.
In short, a book is valuable if it has a small price range and all the offers are high, and less valuable if most of the offers low. The lowest FBM offer can also be used. I buy books at 4x less than the lowest FBM offer.
Demand. This is another important variable we need to consider. Before buying a book, we need to know if it has been selling the past. The way to assess demand for a book at Amazon is by using its BSR, its Amazon Bestsellers Rank.
The BSR is a metric used by Amazon to gauge the popularity of a product at a particular moment in time. Not all items have a BSR; only those that have sold at least once in the past.
The BSR of a book shows its demand at that moment in time and ranges from 1 to the number books sold. It’s a function of sales over time: it goes down when it makes a sale, and up when it doesn’t.
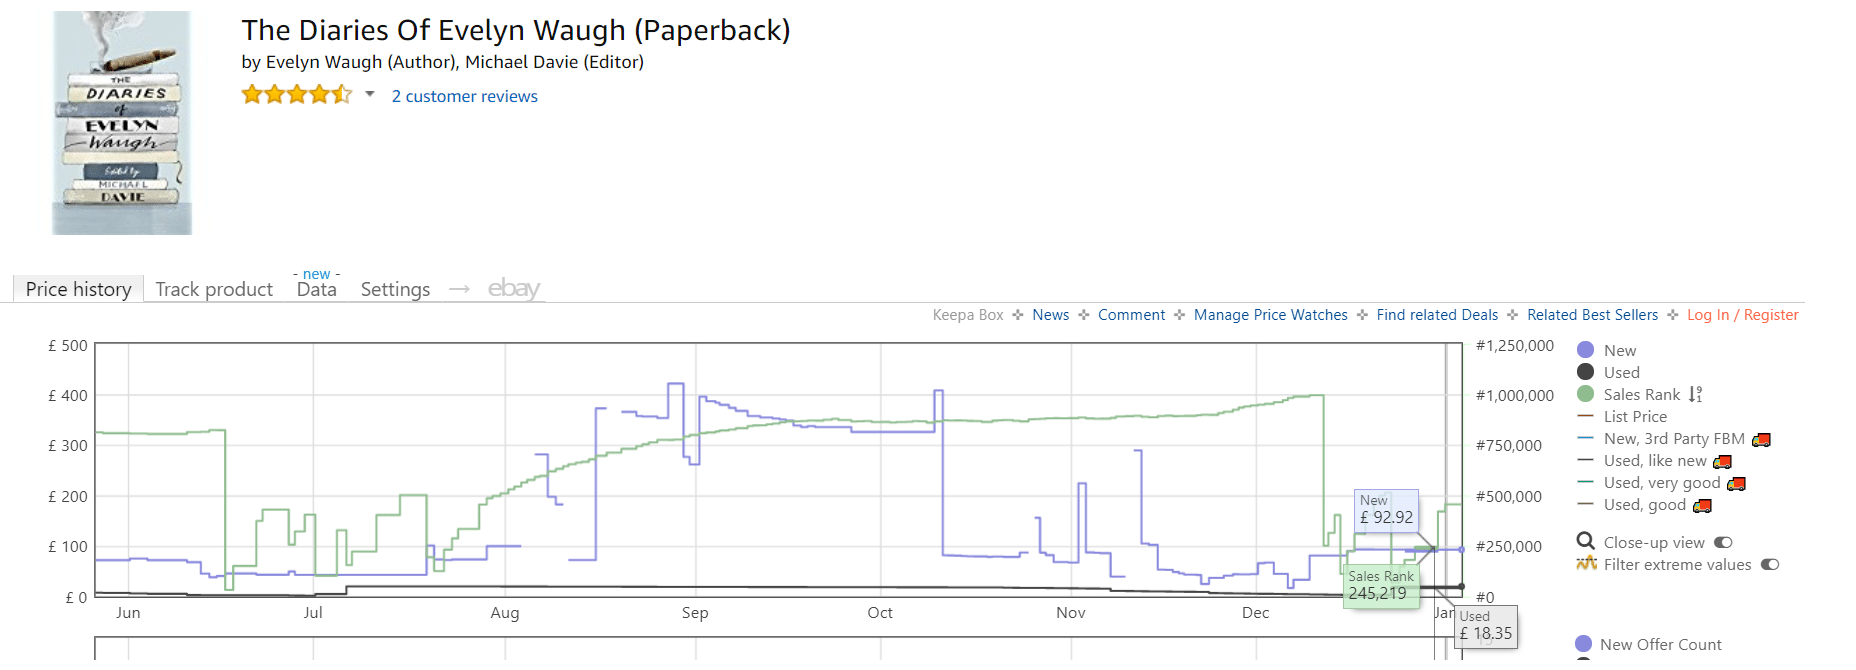
The BSR of a book is misleading, though; it’s only a snapshot of demand. Its BSR history, however, provides a more comprehensive picture. Here is the BSR history of our example book.
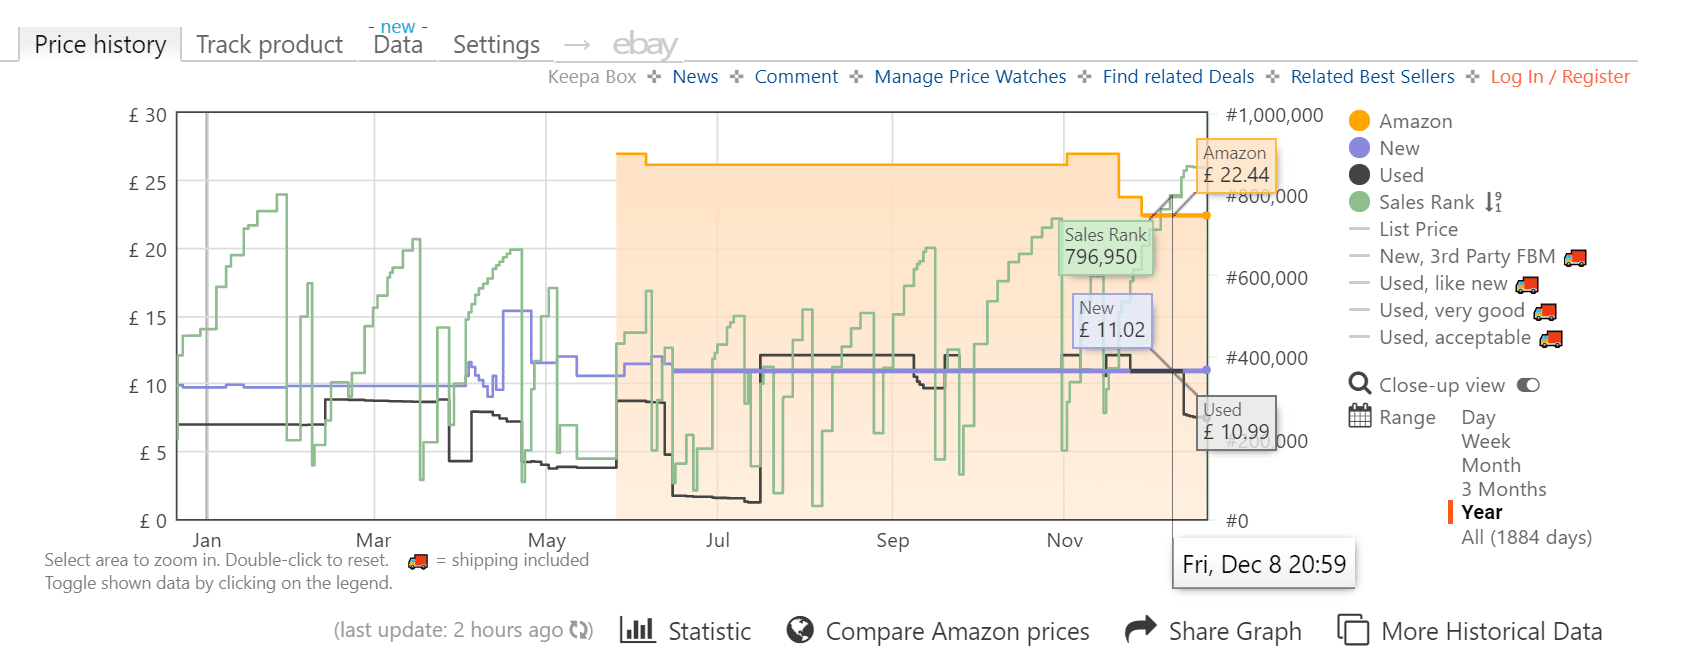
In the above graph, the black line shows the lowest used price; the blue shows the lowest new; the orange shows Amazon’s price, over a year. The volatile green line–where every spike down represents a sale–shows the BSR over a year, indicating a high demand in this case.
This is the kind of book we are looking for — books that have a proven history of selling at high prices but we can buy them at much lower prices.
Competition. The other variable that I consider when is the number of FBA sellers. Particularly when a book has a high rank, say a 1,000,000 BSR. In such situations, the potential profit has to be high and few offers. Assessing the landscape of offers is particularly important for long-tail (high BSR) books because sales are few and far in between.
I see the BSR as an indicator of risk: the higher the BSR of a book, the higher the associated risk – which can be offset by buying books with few FBA offers, high expected profit, and perennial titles.
Example #1 — Order of Christian Funerals: Study Edition
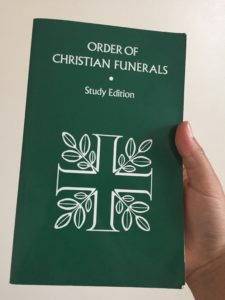
The is one of the books I found in one of our sourcing trips. It had a good average BSR, low competition and had a high historical selling price.
Here are the associated Amazon fees when I listed the book for £19.95, a price more competitive than Amazon’s but higher than the lowest FBM offer.
Referral (15% of the sale price plus shipping): £2.99
Variable Closing (fixed fee based on category): £0.50
Fulfillment Fee: £1.77
Sell on Amazon fee: £0.75 + £0.20*0.75 = £0.90
Total Sell on Amazon fees: £6.16
Our sell on Amazon fee is actually about £0.03 but I’ve included the fee for a basic Sell on Amazon fee for this example.
After including the cost of the book (£1.99) and packaging and other costs (£0.75), we would still have a net profit of £11.05 (19.95 – 6.16 – 1.99 – 0.75). That’s a whopping 403% Return on Investment (ROI).
The Amazon Seller app has a calculator that you can use. Once you’ve scanned a book, just click the price and the calculator will show.
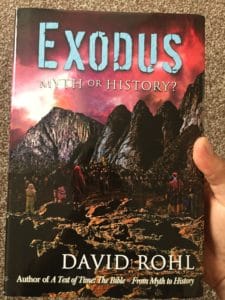
Example #2 — Exodus
Let’s have a look at another example.
This is another book I recently scouted. It had a good BSR, a decent number of positive reviews, Amazon was not selling it and the competition was non-existent. It was an instant Yes.
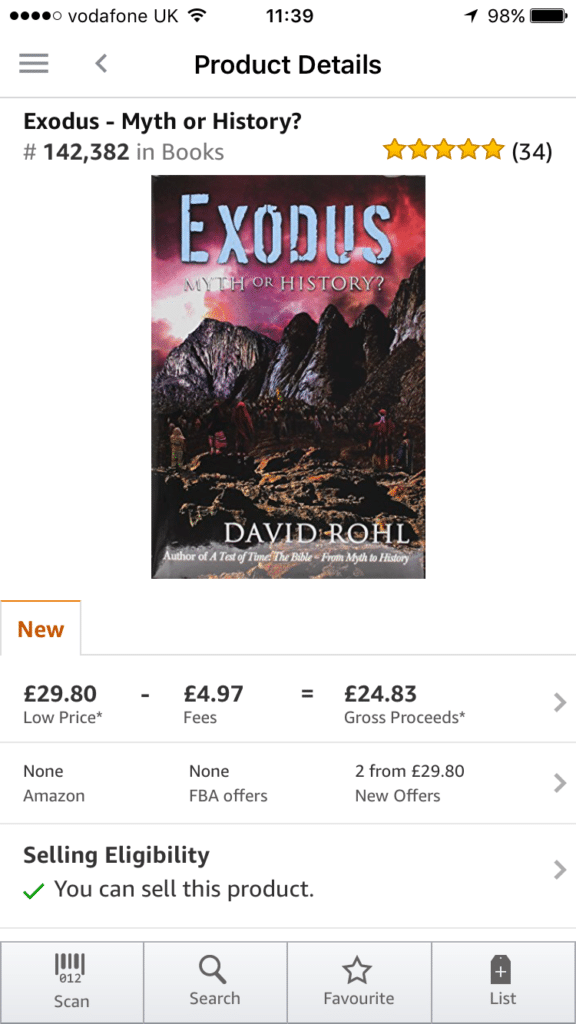
It was a great buy! And it sold quickly, too – within a few weeks actually. Here is how much it sold for.

Note: Ignore the VAT as books are VAT free and we didn’t change the tax code on Amazon at the time.
And here’s a breakdown of the net profit.
 Purchase price: £2.99
Other costs: £0.75
Total cost: £3.74
FBA sell price: £49.99
Amazon Fees:
Referral (15%): £7.50
FBA fulfilment fee per unit: £1.77
Variable closing fee: £0.50
Total: £7.50 + £1.77 + £0.55 = £9.82
Net profit: £49.99 – £9.82 – £3.74= £36.43
974% Return on Investment (ROI). You won’t find this kind of ROI in any other Amazon business model or any other business model.
In summary
Here is a summary of this section:
- Buy as low as possible, preferably at 25% or less of the lowest FBM offer.
- Assess profitability, demand, and supply. Ideally, you want to buy profitable books with low BSR and few FBA sellers.
- Take extra care with higher ranked books. These books can take years to sell, so calculate their potential profit and assess their viability.
- Consider the subject matter of a book. A book, say on mathematics, is more valuable than a Guinness World Record book.
Shipping
Once you have sourced enough books, say 35 or so, you are ready to ship them off to Amazon. But you first need to list, label, package and then finally ship your books to Amazon.
Listing books on Amazon
Listing books on Amazon is easy, at least compared to listing items on EBay, because most items on Amazon already have an existing product page — we just have to find the page we’re looking for and add the product.
We can list a book on Amazon through the Seller Central, the Amazon Seller App or via a third-party software.
Listing books using the Amazon Seller App
When I first started selling books on Amazon, I used the Amazon Seller App on my phone to list books. Here are the steps that I followed:
- Scan a book
- Select List
- Set Condition, and describe the condition of the book in Condition Note
- Set Your Price and add Seller SKU (Optional)
- Select the Amazon as the Fulfilment Channel
- Then select Continue and finally Submit your listing
I would recommend this method when starting out. It’s free and ideal for listing a small number of books.
Listing books using Amazon Seller Central.
You can also list books using your Seller Central. I’ve used this method of listing a few times and isn’t difficult.
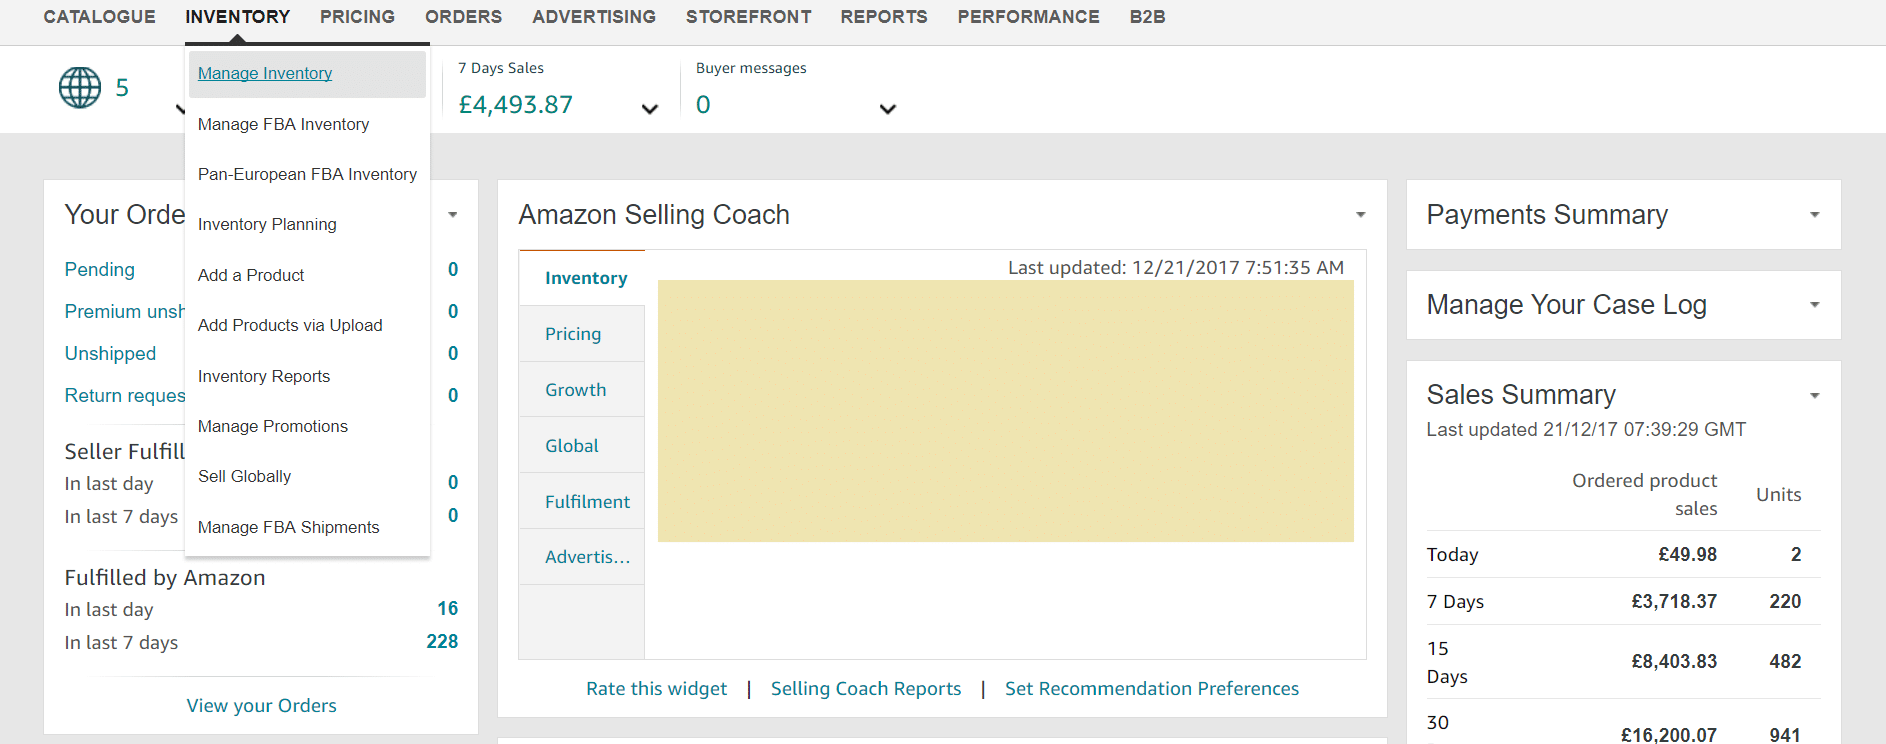
First, click “Inventory” and then “Manage Inventory” from the drop-down menu.
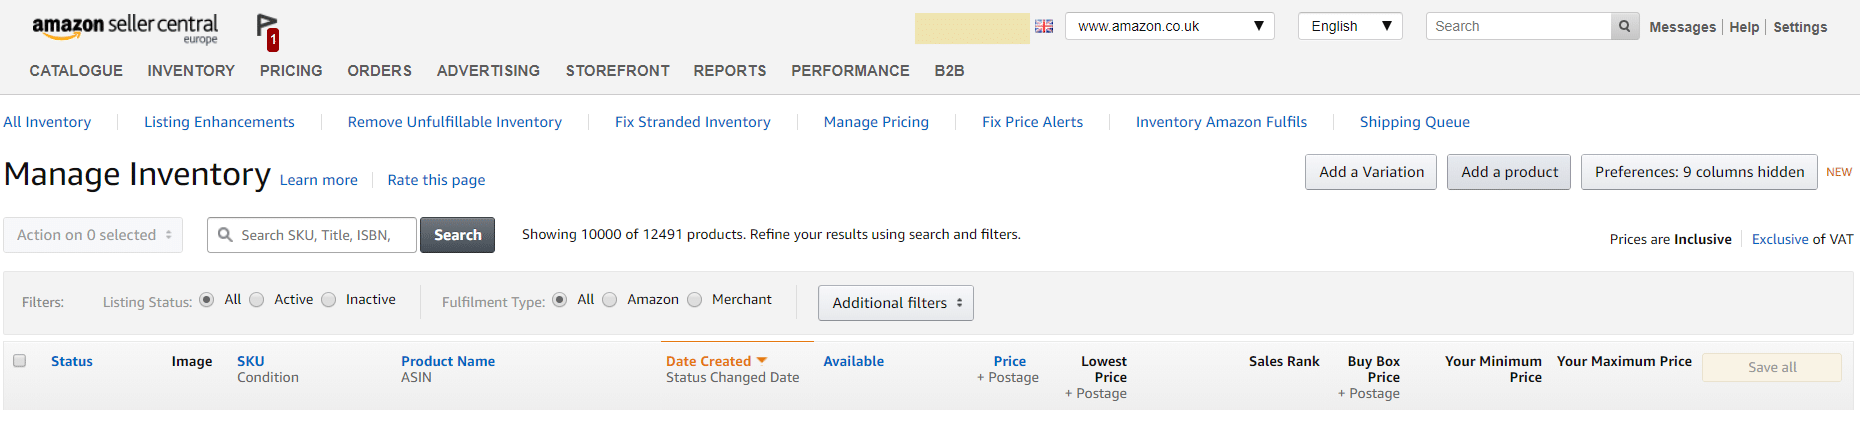
Then, on the “Manage Inventory” page click “Add Product” in the righ-hand corner.
Now you just have to search the title or ISBN of the book you want to list.
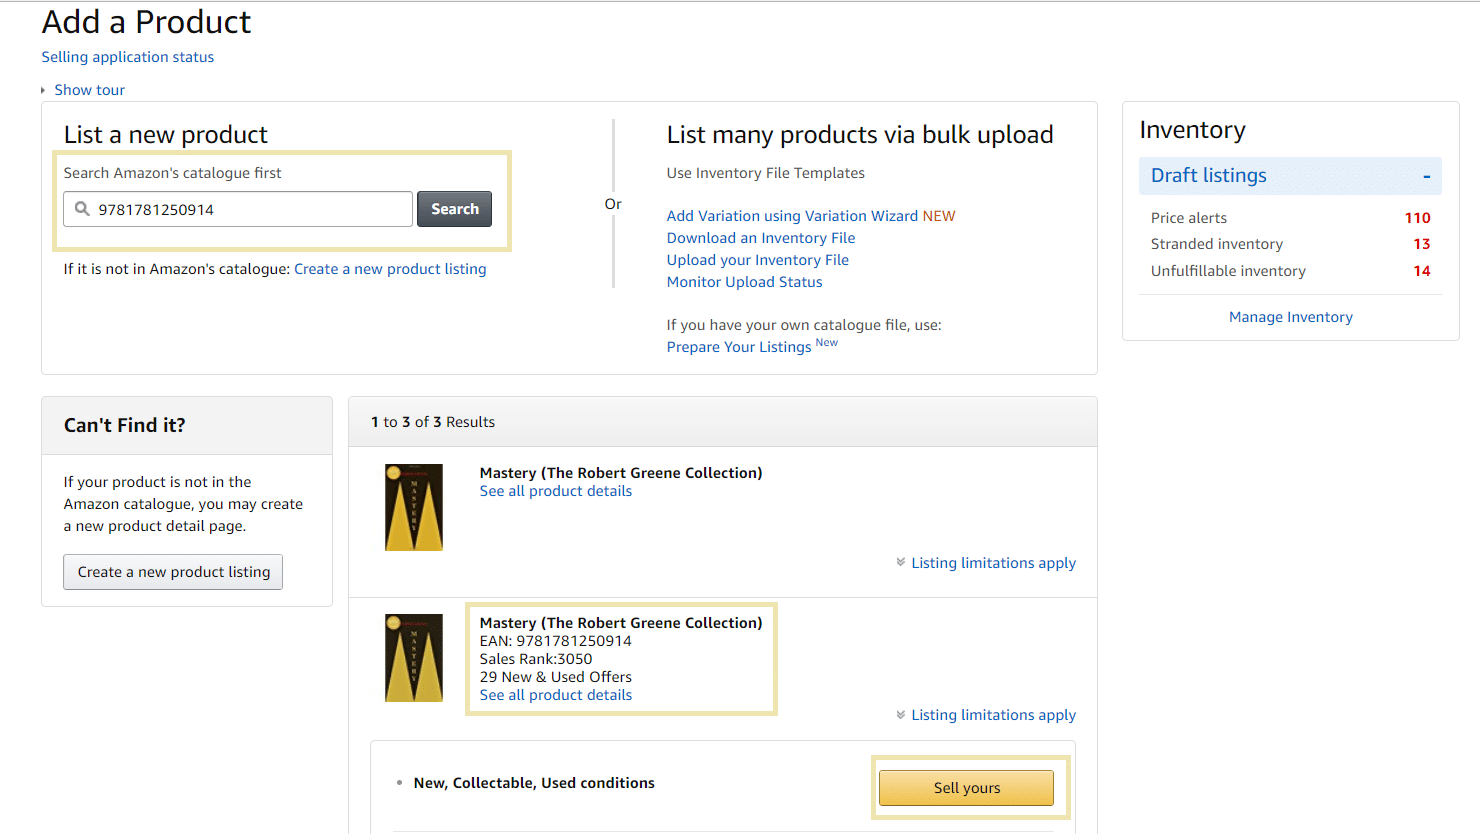
After searching a book, all the product pages associated with the book you searched for will show up. Select the one with the highest number of offers and lowest sales rank.
Then select choose “Sell yours” button, provide all the information required and just follow the instructions.
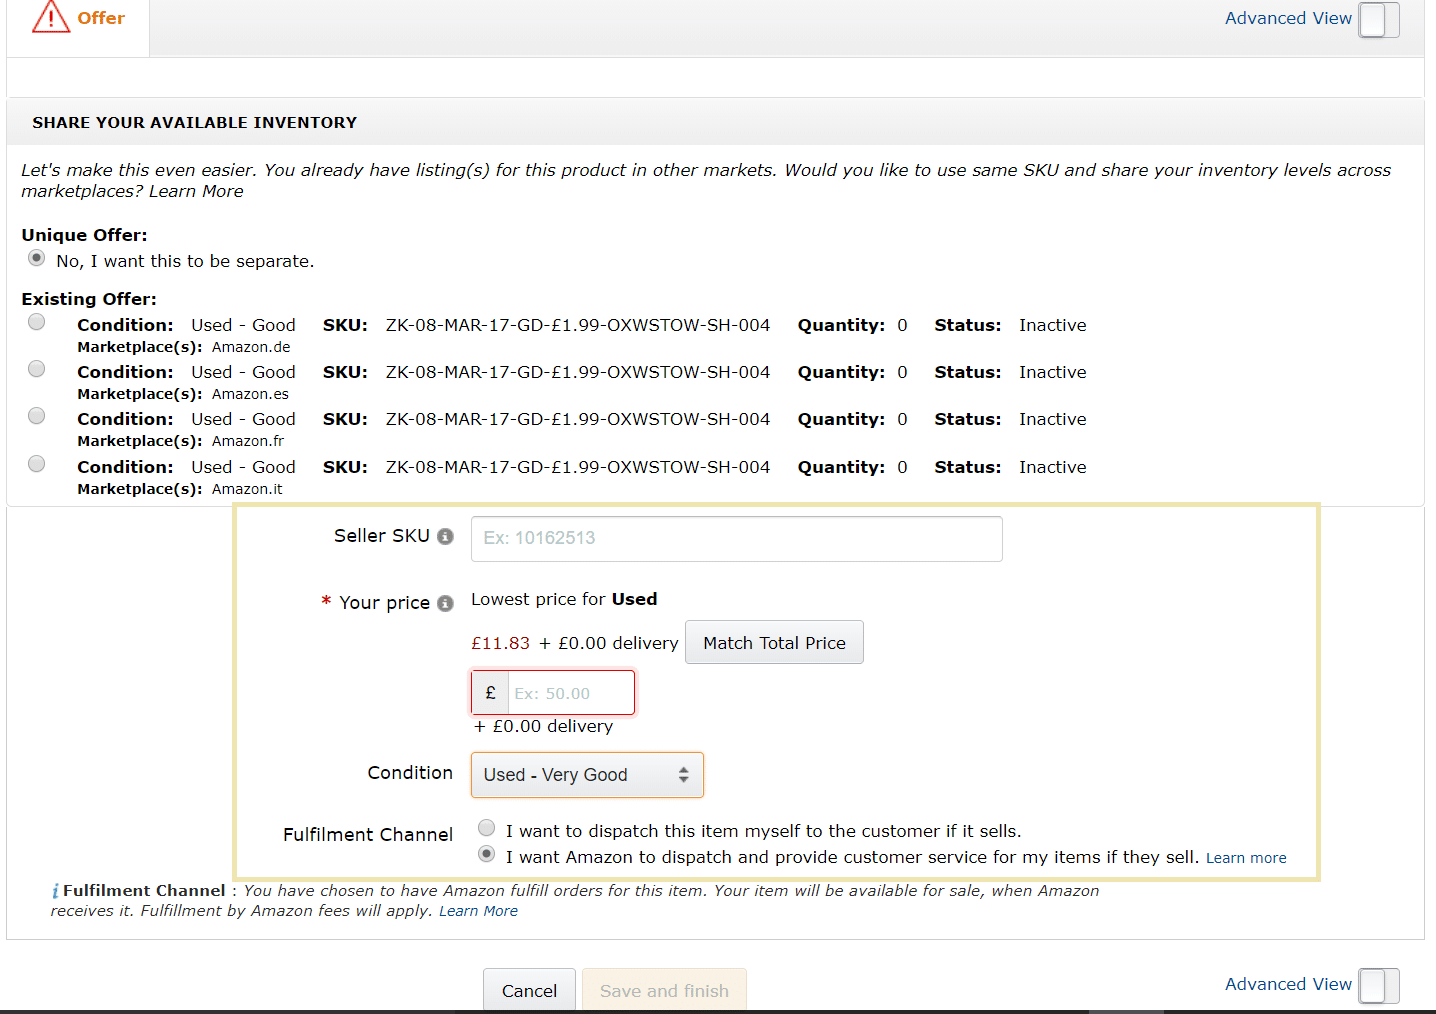
As you can see from the screenshot, listing books this way is straightforward.
Listing books using a software
At the beginning of my bookselling journey, I used the Amazon Seller App and worked well for me. But as I sourced more and more books, listing this way became a lot more time-consuming. To speed things up, I started using a software called ScanLister.
It’s a listing software that speeds the listing process. It allows you to list and print labels in bulk and works in all Amazon marketplaces (USA, Canada, UK, Germany, France, and Spain) and costs only $19 a month and you can cancel it if you don’t find it helpful.
For further readings on Scanlister, check out these posts.
- The Tool That Helped Me List 16,897 Used Books On Amazon — Scanlister Review
- How to Prepare an FBA Shipment: From Start to End
Here’s how I use ScanLister to list books in bulk.
Before listing, it’s important to sort your books into condition categories based on Amazon’s Condition Guidelines. Make sure to read it and create your own general Condition Note for each condition category.
Another important aspect is the SKU (Stock Keeping Unit) identifier — I would recommend assigning appropriate identifiers to help you in the future in terms of inventory analysis.
I use the following SKU anatomy: [SKU Prefix-SKU Sequence-SALESRANK]. In my SKU Prefix, I like to include my initials, date, and location, and condition of the book.
The process hereafter is straightforward: I set a SKU identifier, select a condition and a condition note, and then scan each book using a barcode scanner into ScanLister. And then just hit List On Amazon button.
Setting up ScanLister to print labels in order.
When I first started using ScanLister, labelling took a lot of my time because I didn’t know Amazon sorts SKUs in an alpha-numerical fashion in a shipment. So my labels printed in a random order, and so it took me a long time matching them to their books.
To print your labels in the order that you listed, make sure that the sequence is near the beginning when developing your SKU anatomy.
Creating a shipment on Amazon
After about five minutes, your books will have been listed on Amazon and assigned unique barcodes so that they can be tracked. You will need to download and print these labels and match them to their books, covering the ISBN barcode of each book.
In order to do this, you need to first create a shipment. In other words, you need to notify Amazon of the units you want it to fulfill.
After which you be directed to “Send/Replenish Inventory” page. Check the “create a new shipping” radio button:
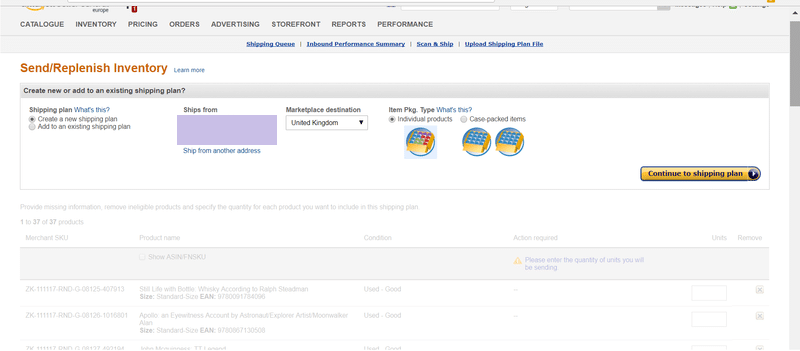
Then just specify the quantity of each book and click Continue. And then select and download the 24-up (70mm by 36mm labels) labels.
Printing labels
Amazon recommends using a laser or a thermal printer rather than an inkjet when printing labels because so that the barcodes don’t get smudged. If you have a laser printer, you just need to buy some address labels.
But if you don’t, then you should consider getting a Dymo LabelWriter 450 thermal label printer, with 57 mm by 32mm labels. It’s a lot cheaper than a laser printer and is as effective. It will also last for a long time too. I’ve been using mine for 7 months now and it’s still working fine.
Having Dymo is a must. Both of the methods that I will be talking about are based on the assumption that you have a Dymo printer.
Printing labels without ScanLister
If you decide not to get ScanLister, you will have to select and print every label individually. Open your downloaded labels in its pdf format and select “Edit” and then “Take a Snapshot” from the drop-down menu.
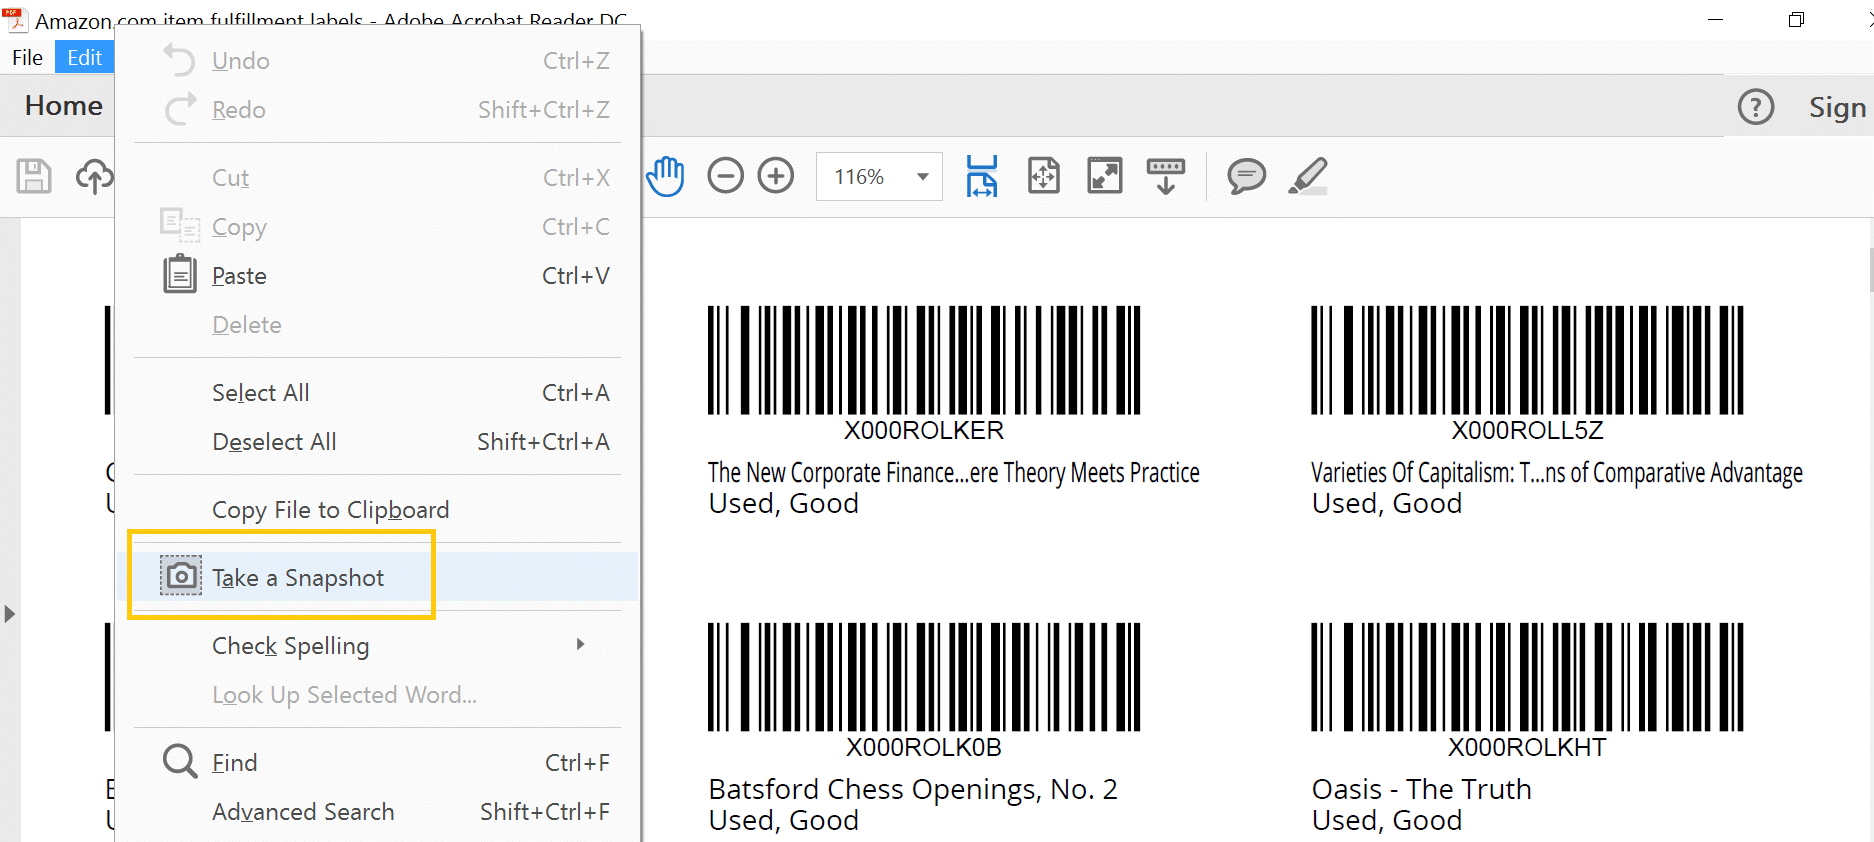
Doing this will allow you to capture a label. Now highlight the entirety of a barcode using your cursor and “Print” by right-clicking the highlighted label.
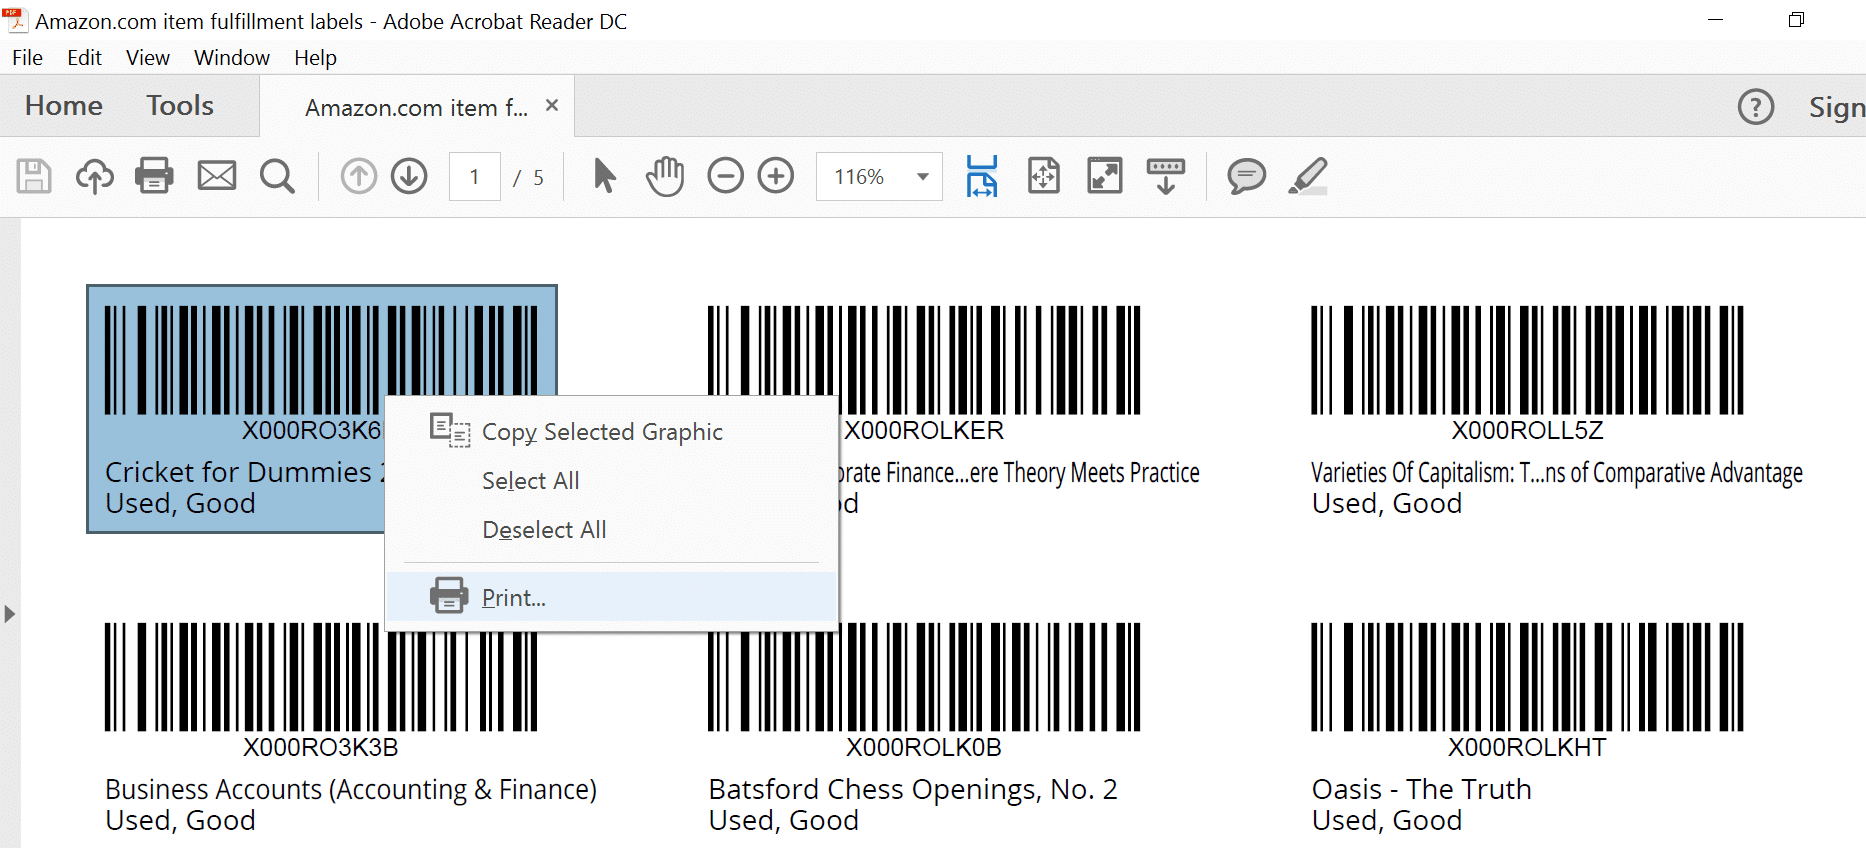
This method works fine for sending a small number of books to Amazon, but not so well for a large number of books. I used this method for my first few shipments but switched to printing using ScanLister soon after as it was inefficient – doing this for hundreds of books is not fun. I had to switch.
Printing labels using ScanLister
I started using ScanLister because it lets you print up to 100 labels with a click of a button ScanLister – all you have to do is just upload your labels and then hit “Print.”
Here’s how to print labels using ScanLister.

Packaging books
After labelling each and every book in your shipment, all that’s left is packaging them in a double walled cardboard box and filling void space using some bubble wrap.
Finally, measure the dimension of shipment and weight it using a shipping scale. You will need this information in order to print your package’s shipping label.
As you can see, I used UPS, Amazon’s partnered courier to ship my package to Amazon. If you use UPS, you get a deeply discounted shipping rate. This package weighed 23kg and cost £11.56 to ship. That’s £0.50 per kilo.
Once your shipment is ready, print your label and use clear tape to stick the entire label onto your package so that it doesn’t get smudged in transit.
Finally, take your shipment(s) to a local UPS (Amazon’s partner courier) drop-off location or arrange a pickup. If you want to schedule a pick-up, you can do so on UPS’s website.
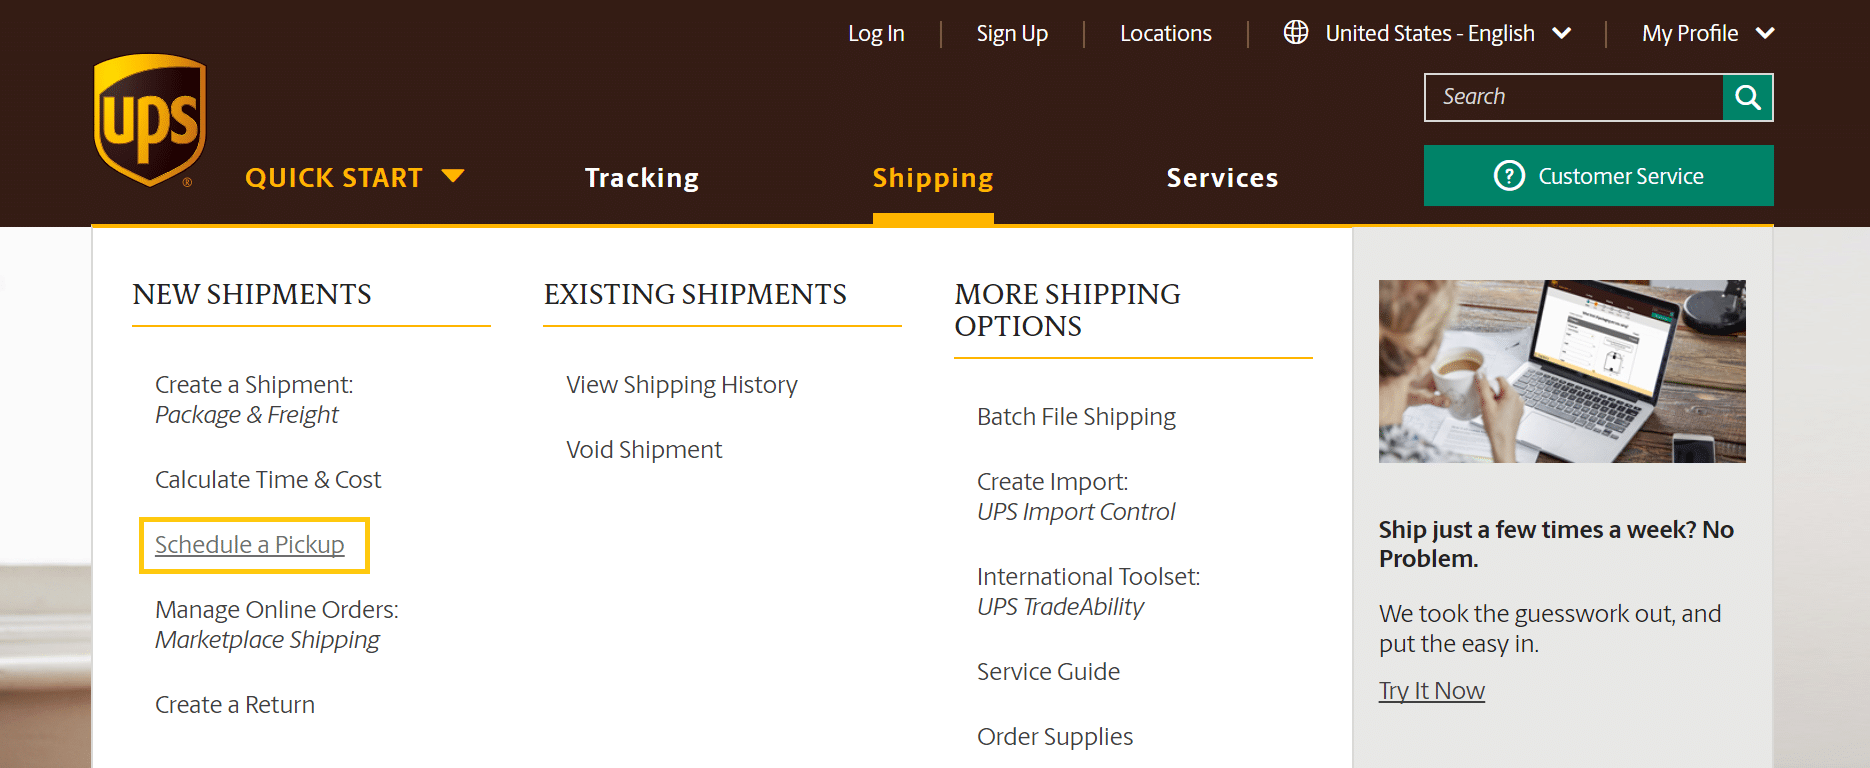
Select “Schedule a Pickup” and follow the instructions.
Pricing
On Ebay, all sellers offering the same product have to create their own product detail page. On Amazon, however, most products have a single product page, which all sellers use to sell that same product. So who does a customer choose to buy from in a sea of sellers all offering the same product? The seller who as the Buy Box most of the time.
Let’s have a look at what the Buy Box is and how it works.
About the Buy Box
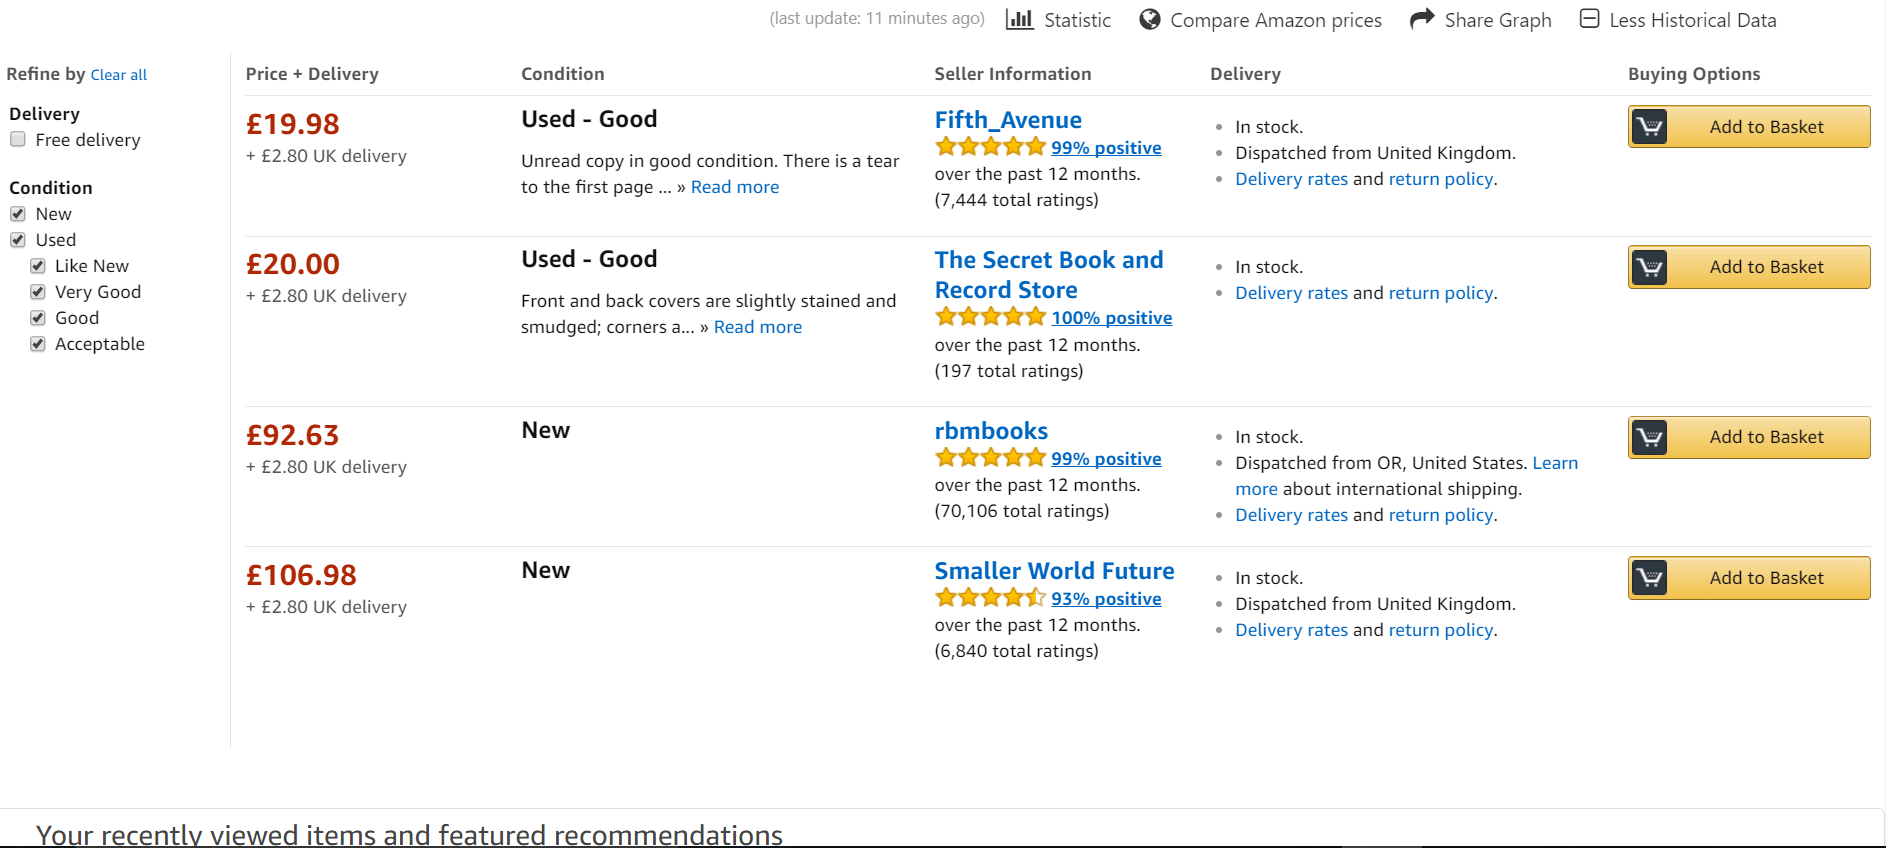
On Amazon, every product detail page has a Buy Box, and sometimes a secondary Buy Box. The Buy Box is just a reference to the Add to Basket call-to-action button on a product’s page, just like the one in the screenshot below.
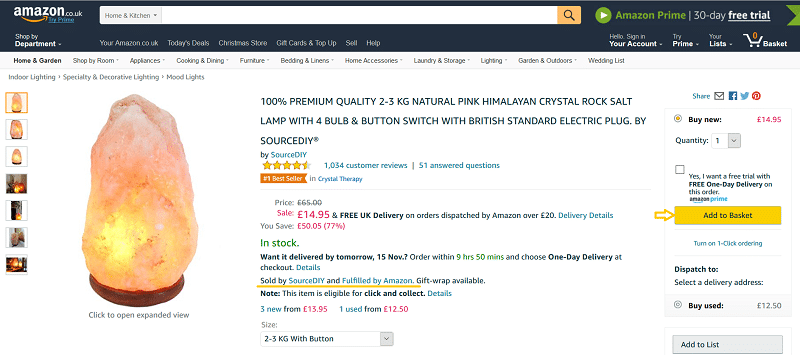
The holder of the Buy Box in this example is a third-party seller called SourceDIY, who is using FBA as their fulfillment method.
Most shoppers don’t browse all offers when looking at a particular product; they purchase through the Buy Box, through which 80% of sales are made at Amazon, according to the Amazon. Therefore understanding the factors that influence the Buy Box is an important part of trading on Amazon.
The variables that the Buy Box algorithm uses to determine who gets the Buy Box for a product are mysterious. But it is widely believed to be based on a number of variables (of varying importance), including:
- Fulfillment method. As FBA sellers we benefit from using Amazon’s logistics, meaning FBM sellers cannot compete with our scores for variables such as shipping method and on-time delivery rate.
- Landed price. The price of an item plus shipping charge is called the landed price.
- Feedback rating and count. Having a large number of positive reviews increases the chance of winning the Buy Box.
- Customer response time. Sometimes as FBA sellers we will get customers messaging us directly, and our response time is judged by Amazon, who recommends responding to customers with 24 hours.
Some products have a secondary Buy Box, like the salt lamp above, but it is more common in the books category. The same variables influence the secondary Buy Box.
In the above screenshot, the secondary Buy Box is awarded to an FBM seller called World of Books.
How I price books
I initially price books at £100 and adjust them once at Amazon. The aim at this stage is to price with the aim of getting the next sale but at the same time maximise our profit.
I price every book based on its dynamic, on some variables that are common to most books I source: Amazon’s price, demand, and competition.
Amazon’s price
Books that Amazon sells. It’s important to consider Amazon’s price for the new copy of a book because it’s the ceiling price, the maximum price we can set.
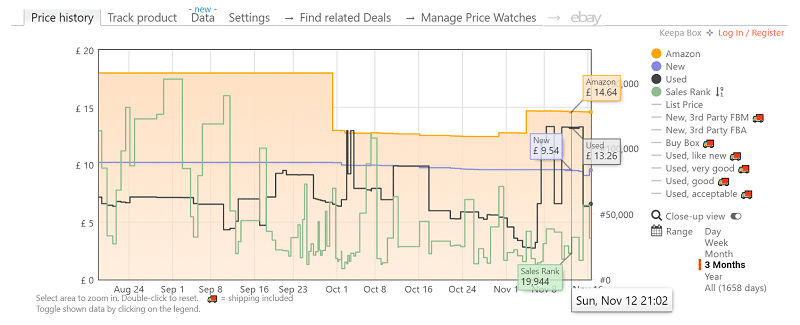
As you can see from the graph, the sales history shows that this book has a high demand. The £14.64 price is Amazon’s price for the new copy of this book.
I use the following guidelines to price books that Amazon sells:
- Like New books at 85% of Amazon’s price
- Very Good books at 80% of Amazon’s price
- Good books at 75% of Amazon’s price
- Acceptable books at 70% of Amazon’s price
I have found these discounts to be attractive enough to lure some customers away from buying a new copy.
Books that Amazon doesn’t. Therefore it doesn’t make sense to price a used book higher than its new price using the same fulfilment method. If there aren’t any FBA offers in the primary market (new books), however, a used book can be priced as high as its new offers.
I don’t use these guidelines for books that Amazon doesn’t sell. I enjoy pricing these books not only because they don’t have ceiling prices but also because they increase our chance of getting a sale, since buyers have no choice but to turn to used books, to the secondary market.
Here is an example of a book that Amazon doesn’t sell a new copy of:
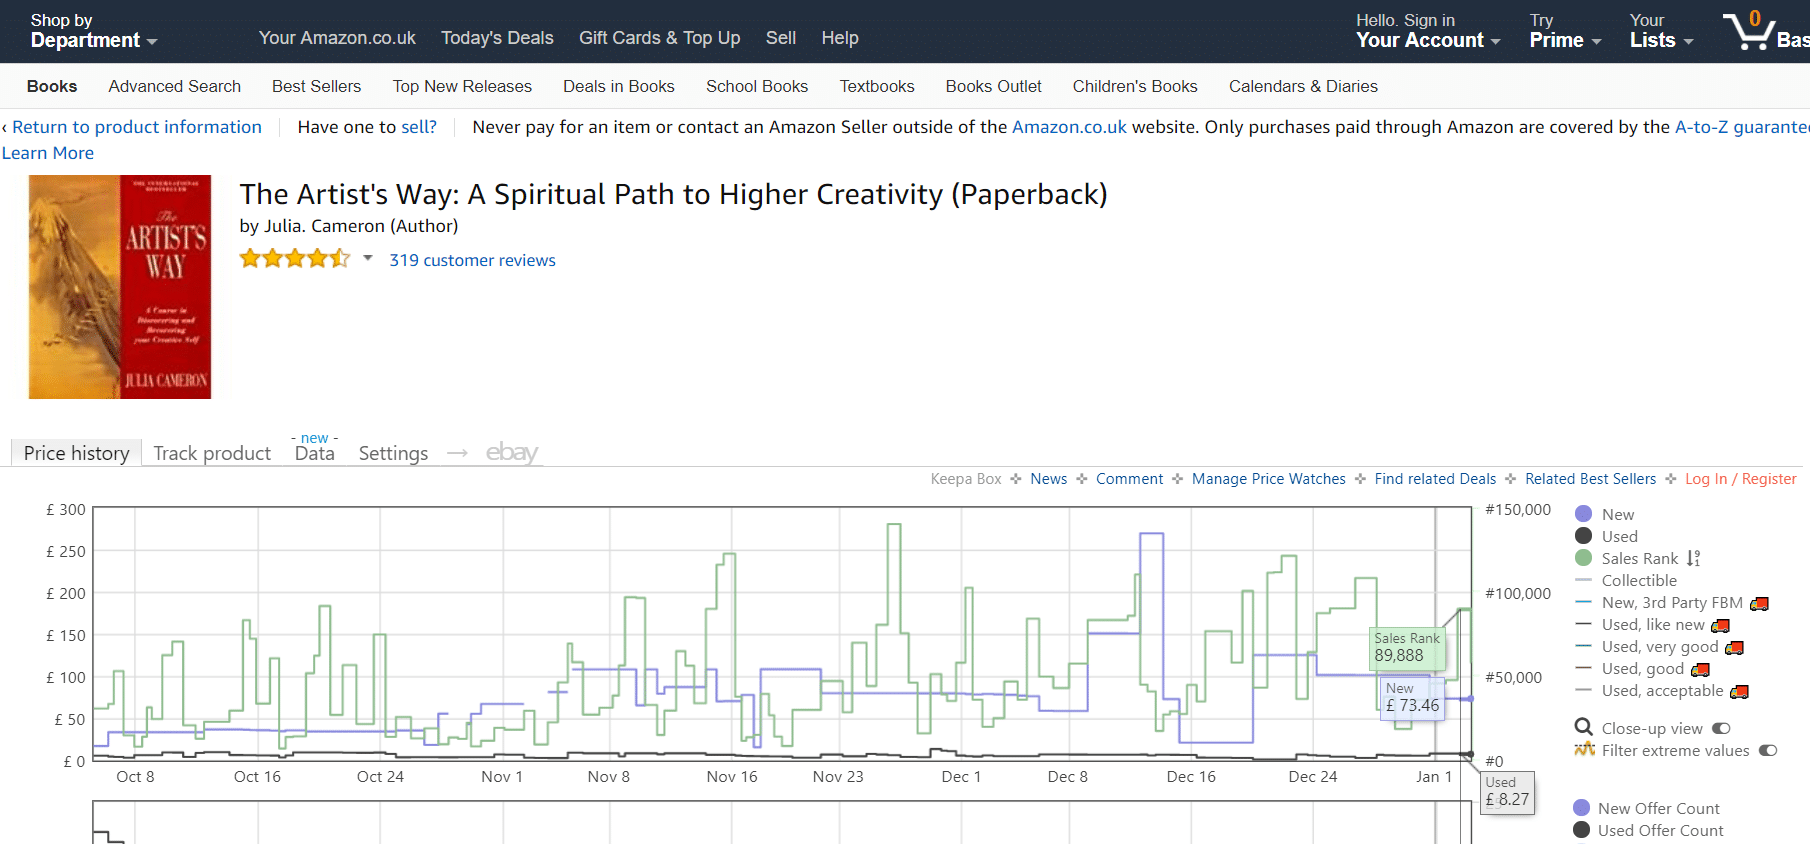
The BSR has been consistently low for three months and Amazon does not sell it. This is a great opportunity to maximise profit. I price this kind of books for two to three times the lowest FBA offer.

Demand
Regardless of whether Amazon sells a book, we always consider a book’s BSR history. We price books with a high demand differently to those that don’t.
We price books with high demand as high as possible. This is because high demand books sell frequently, and so there’s a higher chance of getting the Buy Box at a higher price.
Conversely, if demand is low for a book, setting a high price will decrease our chance of winning the Buy Box. In such situations I either price just 10% higher than the lowest FBM offer or match it, depending on other FBA sellers.
Competition
When the number of offers is high and sales are low, I price competitively in order to get the next sale. Or match the lowest FBA offer. If however, the number of offers is low, I price higher than the lowest FBM. Or match lowest FBM offer if it exists.
If there are some demand and supply is very low for a book, I price it very high as the scarcity increases its attractiveness. Here is an example:
The demand is very low for this book – it has only sold five copies in the six months. The price history shows this book was being at low prices. But supply is also low and no FBA offers. This immediately increases its appeal. I sold this book for a lot higher than the lowest FBM offer.

Make sure to get the most out of the books that you source. And remember cash flow king in this business.
Repricing
Most products on Amazon have multiple sellers offering them, meaning their prices are always changing. So sometimes you might price a book too high, sometimes too low.
Therefore we have to reprice often to be competitive and increase our chances of winning the secondary Buy Box for eligible books. You can reprice manually or automatically through a third-party software.
Personally, I price my books optimally in the beginning so that I don’t have to reprice them later. My belief is that not all books will have a secondary Buy Buy, meaning customers are likely to look at all the offers. So if we price appropriately initially we will still make sales without needing to reprice.
And when I need to reprice, I prefer manual repricing method. I prefer to reprice books manually for two reasons: first, we can maximise our profit for a book by analysing its dynamic, which is different for every book.
Second, repricing manually is educational. It forces us to understand basic concepts such as supply and demand. Which is critical to succeeding in any business endeavour.
There are plenty of Amazon repricing products on the market, though. You could use one if it suits your needs and if it will benefit your business. But I don’t see using one as an option for now, although I am a big fan of automation.
Update: I don’t reprice my inventory of books manually anymore. It was taking too much time and got mundane. You can read more about my transition in the following posts.
- Manual Repricing Vs Automatic Repricing
- BQool Repricing Software: How to Reprice Your Amazon Inventory
- BQool — The Best Amazon Repricing Software? Find Out In This Review
Summary
Here is a recap of the steps involved in starting an FBA bookselling business:
- Open an Amazon selling account.
- Download the Amazon Seller App.
- Go out and source some books.
- List your books on Amazon.
- Label them.
- Package your books and ship them to Amazon.
- Price your books at optimally.
I wrote this post over several days because I wanted to include every aspect of an FBA bookselling hustle, so I hope you’ve found it useful. And please comment below if I’ve left anything out.
Further readings
- FBA Bookselling — A stepping stone into Amazon FBA Wholesale
- How to Find Stock for Resale
- Amazon FBA Bookselling Tools and Resources for Complete Newbies
- How to Prepare an FBA Shipment: From start to End
- Shipping books to Amazon FBA the LTL (Less Than a Truckload) way
- The Tool That Helped Me List 16,897 Used Books On Amazon — Scanlister Review
- How to Remove Negative Seller Feedback on Amazon
- Claim Reimbursements for Lost, Damaged or Missing Inventory
- How to Claim Reimbursements for Returns